Build a production ready PWA with Angular and Firebase
This tutorial will cover building, optimizing and hosting your PWA which will provide native-like app experiences on the production environment.

Önder is an award-winning technical leader with experience designing, planning and implementing software solutions at scale for clients that are active in Travel, Media, IT-sourcing, E-commerce, Healthcare, Airline, SaaS and Finance industries since late 90s. JavaScript and web has always been his passion and nowadays he enjoys it at its full while working as an independent contractor. He believes in team work and he shares his knowledge with the communities as a co-organise, speaker and trainer. He's also interested in photography, movies and dancing.
Angular has a great set of tools for developers to help them easily start developing apps. After introducing schematics, Angular team took their game even further.
Being a Progressive Web App evangelist, it’s no surprise that one of my favourite ng schematics is @angular/pwa. This schematic gives you a head start on your PWA development journey. However, you need to do more on your app to create the best experiences for your users on multiple mobile platforms.
This tutorial will cover how to build, optimise and host your PWA to provide native-like app experiences on the production environment. It provides guidelines for best practices and platform optimisations. In addition to that, your PWA will score 💯 on Lighthouse PWA audit after following the guidelines and tips described in this article.
Before going forward, keep in mind that this is a tutorial and you might want to keep track of your progress. I host international workshops with almost the same content as in this article. That’s why I created a repo for the workshop material on GitHub. You can do the workshop yourself remotely if you wish 👇
If you like the workshop, I appreciate your star on GitHub. Here we go!
1. Adding @angular/pwa schematic to an Angular app
The first thing you need to do -on your brand new or existing Angular app to build a Progressive Web App - is adding @angular/pwa schematic to your app.
You can do this by simply running add command on your Angular CLI.
ng add @angular/pwa
💡 TIP — Use `npx ng` command in your Angular project without installing a global @angular/cli package on your system.
Adding @angular/pwa schematic will create following files on your project, which we will dive into later on.
ngsw-config.json
src/assets/icons/icon-128x128.png
src/assets/icons/icon-144x144.png
src/assets/icons/icon-152x152.png
src/assets/icons/icon-192x192.png
src/assets/icons/icon-384x384.png
src/assets/icons/icon-512x512.png
src/assets/icons/icon-72x72.png
src/assets/icons/icon-96x96.png
src/manifest.json
It will also tweak your angular.json, index.html and app.module.ts files accordingly.
2. Changing Web App Manifest file — manifest.json
The web app manifest is a simple JSON file that tells the browser about your web application and how it should behave when ‘installed’ on the user’s mobile device or desktop. Having a manifest is required by Chrome to show the Add to Home Screen prompt.
A typical manifest file includes information about the app
name,iconsit should use, thestart_urlit should start at when launched, and more.
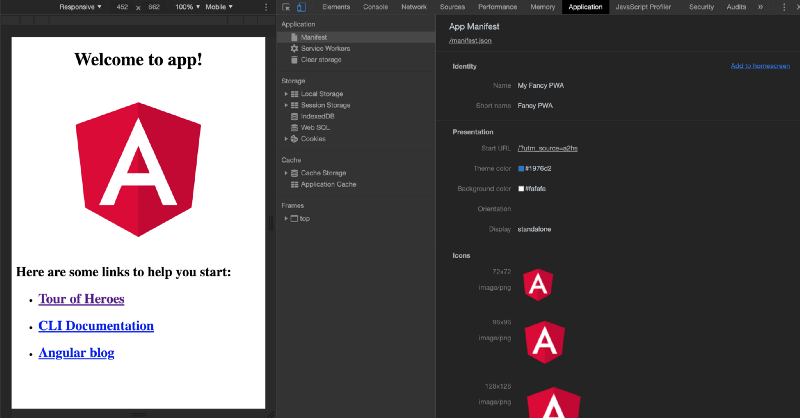
Use Chrome DevTools’ Application tab to inspect your app’s manifest.json file
2.1 Adding description
One of the improvement points that I see on the manifest.json file, which was generated by @angular/pwa schematic, is the addition of description field. Description field is documented on both W3C Web App Manifest spec and MDN.
{
  "description": "My Fancy PWA is a dummy Angular app which demonstrates a PWA's behaviour on different platforms."
}
2.2 Tracking the start url
It is also a good practice to add a query string to the end of the start_url field in manifest.json file to track how often your installed app is launched from users’ home screen.
{
  "start_url": `"/?utm_source=a2hs"
}
💡 TIP — Providing a name, description and an app icon that is at least 512 x 512 pixels will help your app to be automatically indexed and packaged on Microsoft Store.
Example of a full manifest.json file that I use on one of my PWAs:
{
  "name": "ITNEXT Summit 2018",
  "short_name": "ITNEXT",
  "description": "Be the best explorer in next-gen technologies. Experience use-cases, howtos and best-practices with latest frontend and backend technologies, network and security, engineering and low-code development with OutSystems.",
  "theme_color": "#ffffff",
  "background_color": "#ffffff",
  "display": "standalone",
  "orientation": "portrait",
  "scope": "/",
  "start_url": "/?utm_source=itnext_pwa_a2hs",
  "icons": [
    {
      "src": "assets/icons/icon-72x72.png",
      "sizes": "72x72",
      "type": "image/png"
    },
    {
      "src": "assets/icons/icon-96x96.png",
      "sizes": "96x96",
      "type": "image/png"
    },
    {
      "src": "assets/icons/icon-128x128.png",
      "sizes": "128x128",
      "type": "image/png"
    },
    {
      "src": "assets/icons/icon-144x144.png",
      "sizes": "144x144",
      "type": "image/png"
    },
    {
      "src": "assets/icons/icon-152x152.png",
      "sizes": "152x152",
      "type": "image/png"
    },
    {
      "src": "assets/icons/icon-192x192.png",
      "sizes": "192x192",
      "type": "image/png"
    },
    {
      "src": "assets/icons/icon-384x384.png",
      "sizes": "384x384",
      "type": "image/png"
    },
    {
      "src": "assets/icons/icon-512x512.png",
      "sizes": "512x512",
      "type": "image/png"
    }
  ],
  "gcm_sender_id": "103953800507"
}
3. Displaying an A2HS guideline
Google Chrome automatically detects a PWA on Android systems and if the site meets the add to home screen criteria, it shows an install banner or mini info bar to the user to allow them adding it to their home screen.
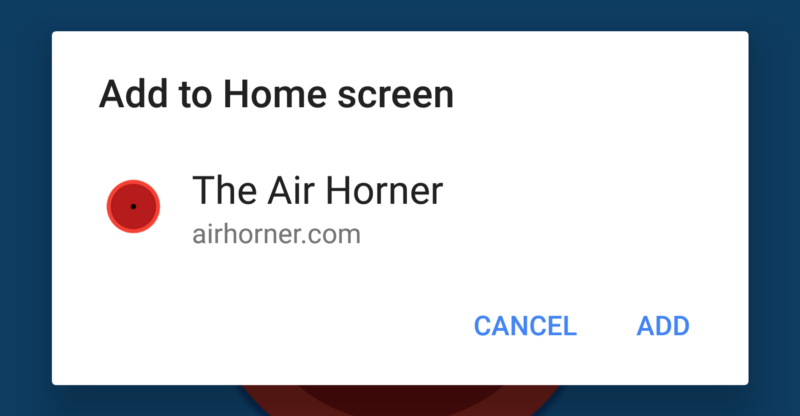
Add to Home Screen dialog on Android
💡 TIP — short_name field in your manifest.json will represent your PWA’s name when it’s added to a home screen. Additionally, name field will be used on Add to Home Screen prompt on Android!
Such functionality does not exist on iOS. But, luckily we can build our own UX to guide users towards the required taps to help them add your app to their home screens.
It can be a good old popup;
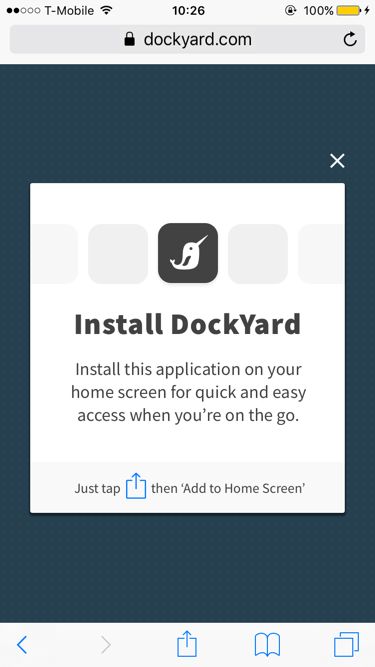
A popup to guide users —Source: https://dockyard.com/blog/2017/09/27/encouraging-pwa-installation-on-ios
Or, even better; a mini-info bar which mimics Chrome’s behaviour on Android platforms to create a uniform experience across platforms.
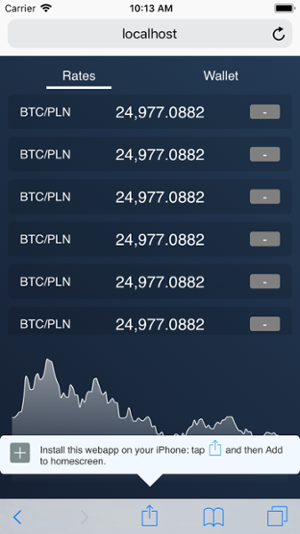
A mini-info bar like guidance — Source: https://www.netguru.com/codestories/few-tips-that-will-make-your-pwa-on-ios-feel-like-native
For example, I used a bit of code on one of my PWAs to introduce this behaviour.
import { get, set } from 'idb-keyval';
import { ToastController } from '@ionic/angular';
async showIosInstallBanner() {
  // Detects if device is on iOS
  const isIos = () => {
    const userAgent = window.navigator.userAgent.toLowerCase();
    return /iphone|ipad|ipod/.test(userAgent);
  };
  // Detects if device is in standalone mode
  const isInStandaloneMode = () => ('standalone' in window.navigator) && window.navigator.standalone;

  // Show the banner once
  const isBannerShown = await get('isBannerShown');

  // Checks if it should display install popup notification
  if (isIos() && !isInStandaloneMode() && isBannerShown === undefined) {
    const toast = await this.toastController.create({
      showCloseButton: true,
      closeButtonText: 'OK',
      cssClass: 'custom-toast',
      position: 'bottom',
      message: `To install the app, tap "Share" icon below and select "Add to Home Screen".`,
    });
    toast.present();
    set('isBannerShown', true);
  }
}
4. Adding meta tags for platform optimisation
WebKit is the web browser engine used by Safari, Mail, App Store, and many other apps on macOS, iOS, and Linux — https://webkit.org/
Although many browsers adopted the Web App Manifest spec, WebKit (specifically, Mobile Safari on iOS) currently uses custom non-standards track meta tag implementations.
Because of that, Apple’s iOS doesn’t create a splash screen or an app icon for a PWA automatically the same way that Google’s Android does based on the app’s manifest file. This prevents your PWA to provide native-app-like experience.
💡 TIP — Keep an eye on WebKit Feature Status for tracking the progress of the implementation of web standards. For instance; once Web App Manifest specs is implemented on WebKit, you won’t need to use custom meta tags anymore. Track the progress here: https://webkit.org/status/#?search=manifest
Fortunately, there is a workaround to configure app icons, splash screens and status bar of your PWA on iOS platform. The workaround is adding custom meta tags to your app’s index.html file!
4.1 Adding meta tags for app icons on iOS
As discussed above, iOS does not recognize the app icons that you’ve put in your manifest file. That’s why you need to add meta tags to your index.html file to optimise your app and its icons for iOS.
The following example demonstrates specifying various sizes for most common iOS devices:
<link rel="apple-touch-icon" href="touch-icon-iphone.png">
<link rel="apple-touch-icon" sizes="152x152" href="touch-icon-ipad.png">
<link rel="apple-touch-icon" sizes="180x180" href="touch-icon-iphone-retina.png">
<link rel="apple-touch-icon" sizes="167x167" href="touch-icon-ipad-retina.png">
You can read more about this topic on Apple’s Safari Web Content Guide.
4.2 Adding meta tags for splash screens on iOS
In order to add splash screen to your PWA on iOS, you must add a meta tag that points out an image for a specific resolution. If the size of an image in the meta tag matches with the device’s resolution, iOS will show the image as a splash screen.
Apple uses a custom link with a rel called apple-touch-startup-image to support splash screens for an app added to iOS home screen, as you can see it here. You also need to set apple-mobile-web-app-capable meta in order to bring the support for splash screens.
<meta name="apple-mobile-web-app-capable" content="yes">
<link rel="apple-touch-startup-image" href="/launch.png">
You need to create static images in different sizes for different devices. Here’s a list of devices and their resolutions:
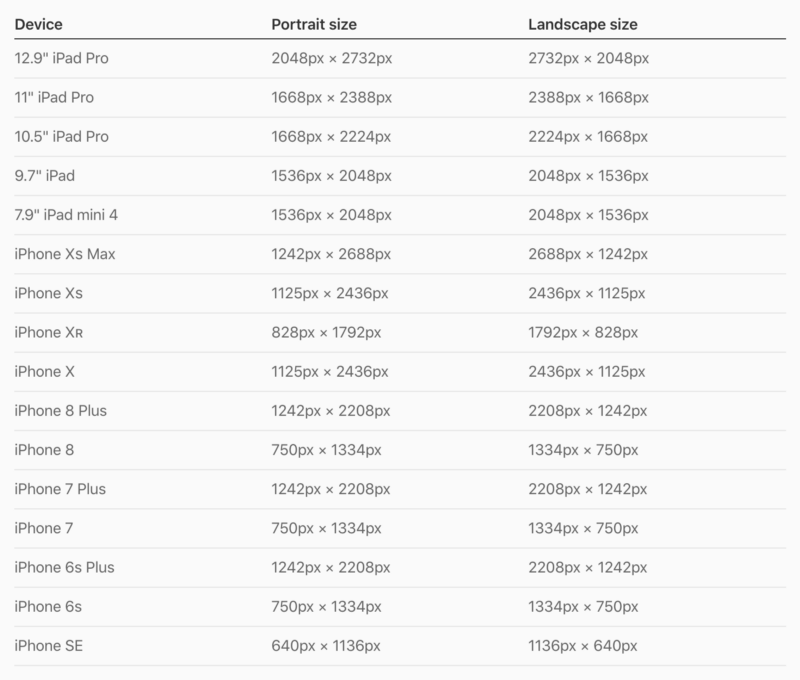
Static launch screen images — Apple Human Interface Guidelines
This is an example of some of the meta tags I have in my PWAs index.html file:
<link href="/assets/splash/iphone5\_splash.png" media="(device-width: 320px) and (device-height: 568px) and (-webkit-device-pixel-ratio: 2)" rel="apple-touch-startup-image">
<link href="/assets/splash/iphone6\_splash.png" media="(device-width: 375px) and (device-height: 667px) and (-webkit-device-pixel-ratio: 2)" rel="apple-touch-startup-image">
<link href="/assets/splash/iphonex\_splash.png" media="(device-width: 375px) and (device-height: 812px) and (-webkit-device-pixel-ratio: 3)" rel="apple-touch-startup-image">
💡 TIP — Use an automated tool to generate your images and their corresponding html codes. Here’s an open source library that I built just for this purpose: https://github.com/onderceylan/pwa-asset-generator
npx `pwa-asset-generator https://github.com/onderceylan/pwa-asset-generator/blob/master/static/logo.png -b "linear-gradient(to right, #fa709a 0%, #fee140 100%)"`
Generate splash screen and icon images and corresponding HTML tags automatically via pwa-asset-generator
4.3 Adding meta tags for the status bar on iOS
You can customize iOS status bar of your PWA by using apple-mobile-web-app-status-bar-style meta tag in your index.html file. This meta tag has no effect unless you specify full-screen mode aka standalone for your PWA.
<meta name="apple-mobile-web-app-status-bar-style" content="white">
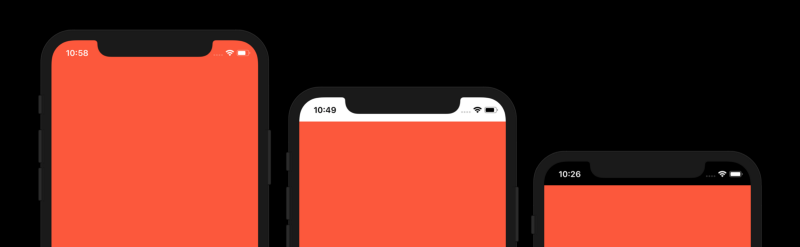
View of the status bars; black-translucent*, **white*, and *black*
Apple only supports 3 options for the content attribute of the meta tag with no further customisation possibility. The options are;
white— displays a white status bar with black text and symbols.defaultvalue has the same effect aswhitebut I prefer white over that. It’s less confusing asdefaultbeing non-default behaviour! 🤯black— displays a black status bar and white text and symbols. This is the default behaviour of a PWA on iOS, when this meta tag is not in place.black-translucent— displays a white text and symbols, with status bar using the same background color of your app’s body element.
4.4 Meta tags for social share
Progressive Web Apps are accessible via web by nature. This means that you can just share a link to your PWA on social media or instant messaging services.
For the convenience of your users who shares your app with their network, I recommend creating a nice preview of your app by adding Open Graph Protocol meta tags to your PWA.

A preview of your app’s link on Twitter with the Open Graph meta tags provided
Here’s an example of required meta tags to provide a nice user experience:
<meta property="og:title" content="ITNEXT Summit 2018 PWA">
<meta property="og:description" content="Check out the PWA of ITNEXT Summit 2018. It rocks!">
<meta property="og:image" content="https://itnext-summit-2018.firebaseapp.com/assets/img/social-share.png">
<meta property="og:url" content="https://itnext-summit-2018.firebaseapp.com">
<meta name="twitter:card" content="summary_large_image">
Furthermore, you can introduce even more optimisations to your PWA to customize user experience on iOS.
Please visit Safari HTML reference for the full list of Apple specific meta tags: https://developer.apple.com/library/archive/documentation/AppleApplications/Reference/SafariHTMLRef/Articles/MetaTags.html
Apart from using the meta tags, some additional optimisations can be done by using simple CSS tweaks. Such as;
- Disabling selection
- Disabling highlighting
- Disabling callouts
- Enabling tab effects
Read more on those here:
5. Configuring ngsw-config.json — Angular Service Worker
When you add @angular/pwa schematic, Angular’s ServiceWorkerModule is injected to your app.module.ts file. This module registers your automatically generated service worker file — ngsw-worker.js which is built by ng cli during the production build.
You can refer to Angular docs for service worker configuration to understand the design and possible options for your configuration.
5.1 Data groups
Unlike asset resources, data requests are not versioned along with the app. They’re cached according to manually-configured policies that are more useful for situations such as API requests and other data dependencies.
What I would like to stress here is the caching strategies for data resources. Angular service worker is designed with brevity in mind, therefore it provides 2 caching strategies.
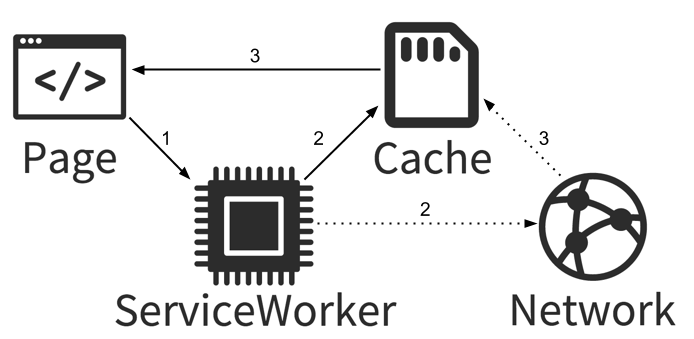
Caching strategy: performance
Suitable for resources that don’t change often; for example, user avatar images. — Angular docs
Performance is a cache-first strategy
performance, the default, optimizes for responses that are as fast as possible. If a resource exists in the cache, the cached version is used. This allows for some staleness, depending on themaxAge, in exchange for better performance. This is suitable for resources that don't change often; for example, user avatar images.
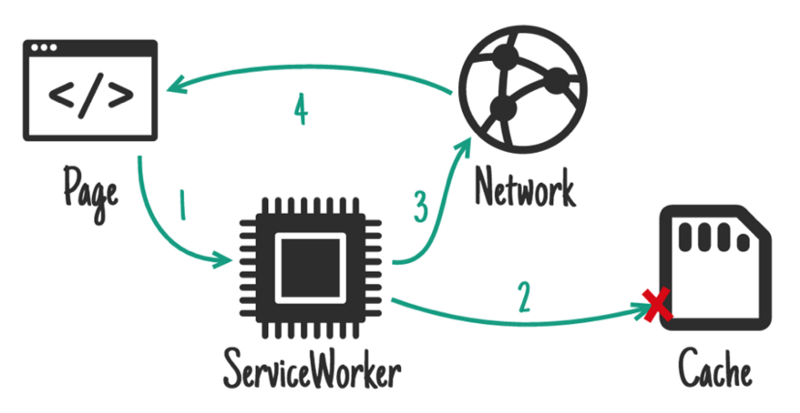
Caching strategy: freshness
Useful for resources that change frequently; for example, account balances. — Angular docs
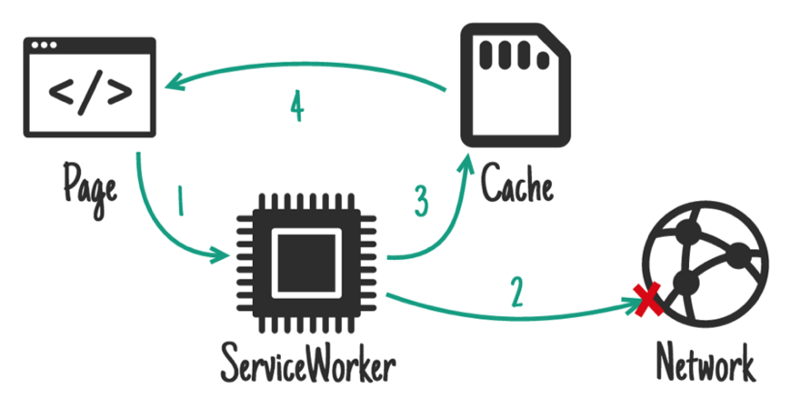
Freshness is a network-first strategy
freshnessoptimizes for currency of data, preferentially fetching requested data from the network. Only if the network times out, according totimeout, does the request fall back to the cache.
"dataGroups": [
    {
      "name": "from-api",
      "version": 2,
      "urls": ["/data/data.json"], // or ["/dashboard", "/user"]
      "cacheConfig": {
        "strategy": "performance",
        "maxSize": 10,
        "maxAge": "1h",
        "timeout": "3s"
      }
    }
  ]
With the example above, data from APIs or a static json file received will be cached with a freshness strategy for a maximum of 10 responses, maximum cache age of 1 hour, and a timeout of 3 seconds, after which the result will fallback to the cache. Freshness is a network-first strategy and alternatively, you can use performance as the strategy for a cache-first strategy.
💡 TIP — Increase version field in dataGroups to invalidate your cache of data resources when your data source has been updated in backwards-incompatible way. A new version of the app may not be compatible with the old data format.
5.2 Asset groups
Assets are resources that are part of the app version that update along with the app. They can include resources loaded from the page’s origin as well as third-party resources loaded from CDNs and other external URLs.
Depending on the policy by which they are cached, you can introduce either lazy or prefetch strategy on each of your asset group. Resources on service worker configuration accept glob-like patterns that match a number of files, like;
"assetGroups": [
    {
      "name": "shell",
      "installMode": "prefetch",
      "updateMode": "prefetch",
      "resources": {
        "files": [
          "/favicon.ico",
          "/index.html",
          "/*.css",
          "/vendor.*.js",
          "/main.*.js",
          "/polyfills.*.js",
          "/runtime.*.js",
          "/*.js",
          "!/*-sw.js"
        ]
      }
    },
    {
      "name": "assets",
      "installMode": "lazy",
      "updateMode": "prefetch",
      "resources": {
        "files": [
          "/assets/**",
          "/svg/**"
        ],
        "urls": [
          "https://fonts.googleapis.com/**"
        ]
      }
    }
  ]
For resources already in the cache, the updateMode determines the caching behaviour when a new version of the app is discovered. Any resources in the group that have changed since the previous version are updated in accordance with updateMode. Angular service worker will automatically handle updates of your assets when there’s a new service worker version for your app.
💡 TIP — When you use a caching strategy, you must exclude the resources that you’d like to keep fresh. Such as additional service worker files that your app might use.
Following example of a full ngsw-config.json file demonstrates asset groups, data groups, app data and a glob for excluding additional service workers:
{
  "index": "/index.html",
  "appData": {
    "version": "1.1.0",
    "changelog": "Added better resource caching"
  },
  "assetGroups": [
    {
      "name": "shell",
      "installMode": "prefetch",
      "updateMode": "prefetch",
      "resources": {
        "files": [
          "/favicon.ico",
          "/index.html",
          "/*.css",
          "/vendor.*.js",
          "/main.*.js",
          "/polyfills.*.js",
          "/runtime.*.js",
          "/*.js",
          "!/*-sw.js"
        ]
      }
    },
    {
      "name": "assets",
      "installMode": "lazy",
      "updateMode": "prefetch",
      "resources": {
        "files": [
          "/assets/**",
          "/svg/**"
        ],
        "urls": [
          "https://fonts.googleapis.com/**"
        ]
      }
    }
  ],
  "dataGroups": [
    {
      "name": "from-static",
      "version": 1,
      "urls": ["/data/data.json"],
      "cacheConfig": {
        "strategy": "performance",
        "maxSize": 10,
        "maxAge": "1d",
        "timeout": "5s"
      }
    },
    {
      "name": "from-api",
      "version": 2,
      "urls": ["/dashboard", "/user"],
      "cacheConfig": {
        "strategy": "freshness",
        "maxSize": 15,
        "maxAge": "1h",
        "timeout": "3s"
      }
    }
  ]
}
6. Configuring angular.json for static assets
Angular Console logo, a GUI for Angular CLI — https://angularconsole.com
One of the most important points to pay attention while building a PWA with Angular is the configuration of static assets. You need to be aware of your build configuration and its output on production build in order to properly cache and serve your static resources.
Adding @angular/pwa schematic to your Angular application automatically registers manifest.json file to your static resource configuration on angular.json configuration. But if you’re using additional files on your root, like robots.txt, browserconfig.xml, or a custom icon set, you need to add those files to your build configuration.
This is the default asset configuration on your angular.json file after adding @angular/pwa schematic:
"assets": [
  "src/favicon.ico",
  "src/assets",
  "src/manifest.json"
]
You may want to extend this configuration as you add static files to your root, or introduce an external plugin. Even more interesting in our case, you may want to introduce an additional service worker to your app on top of your automatically generated ngsw-worker.js.
This is an example asset configuration on angular.json from one of my PWAs:
"assets": [
  "src/manifest.json",
  "src/robots.txt",
  "src/browserconfig.xml",
  "src/favicon.ico",
  {
    "glob": "**/*",
    "input": "src/assets",
    "output": "assets"
  },
  {
    "glob": "**/*.svg",
    "input": "node_modules/@ionic/angular/dist/ionic/svg",
    "output": "./svg"
  },
  {
    "glob": "**/*-sw.js",
    "input": "src/app/sw",
    "output": "/"
  },
  {
    "glob": "**/idb-keyval-iife.min.js",
    "input": "node_modules/idb-keyval/dist/",
    "output": "/"
  }
]
7. Extending Angular service worker
As of February 2019, Angular service worker — aka ngsw doesn’t support the composition of another service worker. This means that you cannot extend Angular service worker’s default behaviour and add your flavour to it.
You can try and edit automatically generated ngsw-worker.js service worker file but every time you build your application for production, this file will be overridden by Angular, based on your configuration on ngsw-config.json.
This architecture may introduce a problem if you plan to do more than what Angular service worker offers to you. No worries though, there is a nice workaround to tackle this issue.
Introducing your own service worker file
You can introduce a new service worker file, say main-sw.js to your Angular app and import automatically generated ngsw within your new service worker.
Assuming you configured your sw files to be copied to your apps root folder — please refer to "**/*-sw.js" glob on the chapter “Configuring angular.json for static assets”, the following importScripts imports on your worker should resolve.
Create a new main-sw.js file in src/app/sw folder with the following content:
importScripts('ngsw-worker.js'); // automatically generated ngsw
importScripts('messaging-sw.js'); // custom service worker #1
importScripts('notifications-sw.js'); // custom service worker #2
After introducing your own service worker wrapper, you must change the service worker reference on your app.module.ts file.
ServiceWorkerModule.register('/main-sw.js', { enabled: environment.production })
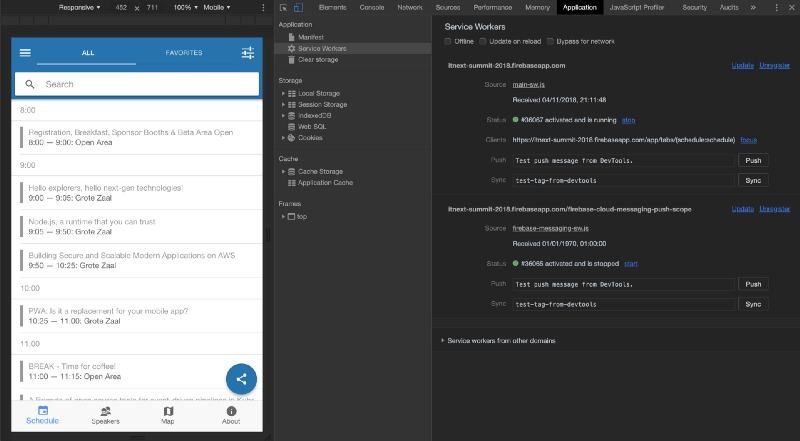
Use Chrome DevTools’ Application tab to inspect your app’s service workers. A demonstration of extended service worker of the ITNEXT 2018 Conference PWA — https://itnext-summit-2018.firebaseapp.com
💡 TIP — By default, service workers are enabled for production environment. Angular recommends building for production and running http-server for testing service workers of your app.
8. Updating your PWA
A service worker is the backbone of a Progressive Web App. And, updating a PWA always starts at its service worker. Browsers regularly check attached service worker of a client app for a byte difference and once service worker file is updated, the browser automatically initializes an update process.
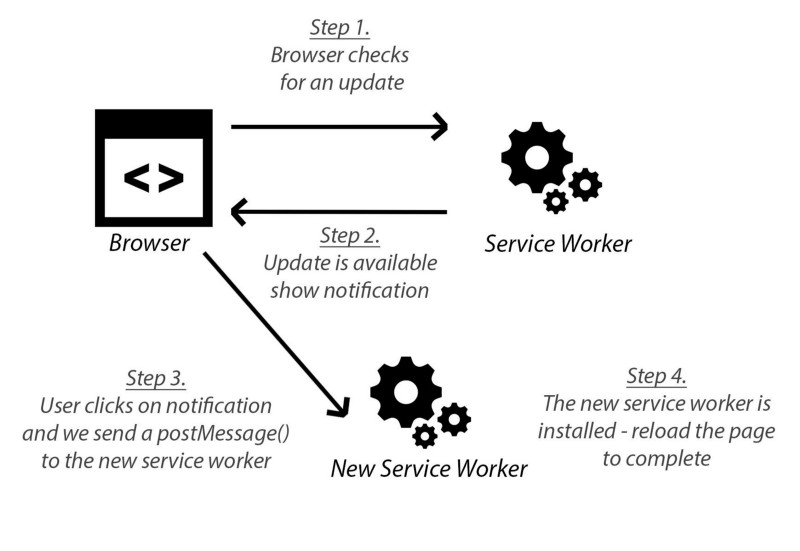
Source: https://deanhume.com/displaying-a-new-version-available-progressive-web-app/
8.1 App versions and update checks
In the context of an Angular service worker, a “version” is a collection of resources that represent a specific build of the Angular app. Whenever a new build of the app is deployed, the service worker treats that build as a new version of the app. This is true even if only a single file is updated. At any given time, the service worker may have multiple versions of the app in its cache and it may be serving them simultaneously.
Every time the user opens or refreshes the application, the Angular service worker checks for updates to the app by looking for updates to the
ngsw.jsonmanifest. This manifest file represents the “version” of an Angular build, along with all the files associated with ngsw-config file. If an update is found, it is downloaded and cached automatically, and will be served the next time the application is loaded.
The ngsw.json manifest file, representing a build aka “version” of an Angular PWA:
{
  "configVersion": 1,
  "appData": {
    "version": "1.1.0",
    "changelog": "Added better resource caching"
  },
  "index": "/index.html",
  "assetGroups": [
    {
      "name": "shell",
      "installMode": "prefetch",
      "updateMode": "prefetch",
      "urls": [
        "/favicon.ico",
        "/index.html",
        "/main.cb67e635642476004207.js",
        "/polyfills.1840410d8aa59aab644c.js",
        "/runtime.a66f828dca56eeb90e02.js",
        "/styles.3ff695c00d717f2d2a11.css",
        "/vendor.3335969a60ee384a24da.js"
      ],
      "patterns": []
    },
    {
      "name": "assets",
      "installMode": "lazy",
      "updateMode": "prefetch",
      "urls": [
        "/assets/icons/icon-128x128.png",
        "/assets/icons/icon-144x144.png",
        "/assets/icons/icon-152x152.png",
        "/assets/icons/icon-192x192.png",
        "/assets/icons/icon-384x384.png",
        "/assets/icons/icon-512x512.png",
        "/assets/icons/icon-72x72.png",
        "/assets/icons/icon-96x96.png"
      ],
      "patterns": [
        "https:\\/\\/fonts\\.googleapis\\.com\\/.*"
      ]
    }
  ],
  "dataGroups": [
    {
      "name": "from-static",
      "patterns": [
        "\\/data\\/data\\.json"
      ],
      "strategy": "performance",
      "maxSize": 10,
      "maxAge": 86400000,
      "timeoutMs": 5000,
      "version": 1
    },
    {
      "name": "from-api",
      "patterns": [
        "\\/dashboard",
        "\\/user"
      ],
      "strategy": "freshness",
      "maxSize": 15,
      "maxAge": 3600000,
      "timeoutMs": 3000,
      "version": 2
    }
  ],
  "hashTable": {
    "/assets/icons/icon-128x128.png": "dae3b6ed49bdaf4327b92531d4b5b4a5d30c7532",
    "/assets/icons/icon-144x144.png": "b0bd89982e08f9bd2b642928f5391915b74799a7",
    "/assets/icons/icon-152x152.png": "7479a9477815dfd9668d60f8b3b2fba709b91310",
    "/assets/icons/icon-192x192.png": "1abd80d431a237a853ce38147d8c63752f10933b",
    "/assets/icons/icon-384x384.png": "329749cd6393768d3131ed6304c136b1ca05f2fd",
    "/assets/icons/icon-512x512.png": "559d9c4318b45a1f2b10596bbb4c960fe521dbcc",
    "/assets/icons/icon-72x72.png": "c457e56089a36952cd67156f9996bc4ce54a5ed9",
    "/assets/icons/icon-96x96.png": "3914125a4b445bf111c5627875fc190f560daa41",
    "/favicon.ico": "84161b857f5c547e3699ddfbffc6d8d737542e01",
    "/index.html": "40b6fc0e0fae9194170df9397b48487bcd139bcd",
    "/main.cb67e635642476004207.js": "622827b74fd2511ca3293cc9e7bc0873e40b38a0",
    "/polyfills.1840410d8aa59aab644c.js": "c59ac0163bbb63bf9a602a38fa41aaa3da1dae99",
    "/runtime.a66f828dca56eeb90e02.js": "078e320cc6fdaf355836c3b1c52b059cdd33fc7e",
    "/styles.3ff695c00d717f2d2a11.css": "da39a3ee5e6b4b0d3255bfef95601890afd80709",
    "/vendor.3335969a60ee384a24da.js": "e06c17d4e5b96102d8bb7828bc473c1a4fce27ea"
  },
  "navigationUrls": [
    {
      "positive": true,
      "regex": "^\\/.*$"
    },
    {
      "positive": false,
      "regex": "^\\/(?:.+\\/)?[^/]*\\.[^/]*$"
    },
    {
      "positive": false,
      "regex": "^\\/(?:.+\\/)?[^/]*__[^/]*$"
    },
    {
      "positive": false,
      "regex": "^\\/(?:.+\\/)?[^/]*__[^/]*\\/.*$"
    }
  ]
}
Read more about ngsw app updates: https://angular.io/guide/service-worker-devops
8.2 AppData on ngsw-config.json
appData field in ngsw-config.json file enables you to pass any data (you want) that describes this particular version of the app. The [SwUpdate](https://angular.io/api/service-worker/SwUpdate) service includes that data in the update notifications. Many apps make use of this field to provide some additional info for the display of any popups, notifying users of the available update.
"index": "/index.html",
"appData": {
  "version": "1.1.0",
  "changelog": "Added better resource caching"
}
8.3 SwUpdate service
Angular handles its service worker updates via its own service called [SwUpdate](https://angular.io/api/service-worker/SwUpdate) from @angular/service-worker module. You can subscribe to UpdateAvailableEvent and UpdateActivatedEvent events on this service to be notified on service worker updates.

ITNEXT 2018 Conference PWA, app update demonstration — See source code on https://github.com/LINKIT-Group/itnext-summit-app
Following example demonstrates a prompt for users, which will be displayed when a new service worker version becomes available. By doing this, we provide an option for users to immediately apply the update.
import { SwUpdate } from '@angular/service-worker';
@Component({
  selector: 'app-root',
  templateUrl: './app.component.html',
})
export class AppComponent implements OnInit {
ngOnInit() {
  if (this.swUpdate.isEnabled) {
    this.swUpdate.available.subscribe(async () => {
      const alert = await this.alertController.create({
        header: `App update!`,
        message: `Newer version of the app is available. It's a quick refresh away!`,
        buttons: [
          {
            text: 'Cancel',
            role: 'cancel',
            cssClass: 'secondary',
          }, {
            text: 'Refresh',
            handler: () => {
              window.location.reload();
            },
          },
        ],
      });

      await alert.present();
    });
  }
}
Please note that you don’t have to provide this manual update functionality. Service workers are automatically updated by the browser on the time of disconnection of all clients or pages attached to it. However, I recommend providing this immediate update option for the convenience of your users.
💡 TIP — Browsers automatically check byte differences of the attached main service worker file, which would be main-sw.js if you’ve extended ngsw. You should make sure that other sw files that you might import to your main service worker are not cached. This will be explained in detail on Firebase hosting configuration on next chapter.
9. Hosting your app on Firebase
Firebase is built around simplicity. It’s quite easy to set up a hosting and configure deployments for your application.
Once you’ve logged in to Firebase console, you can click on Add Project button and fill in the form below with your preference.
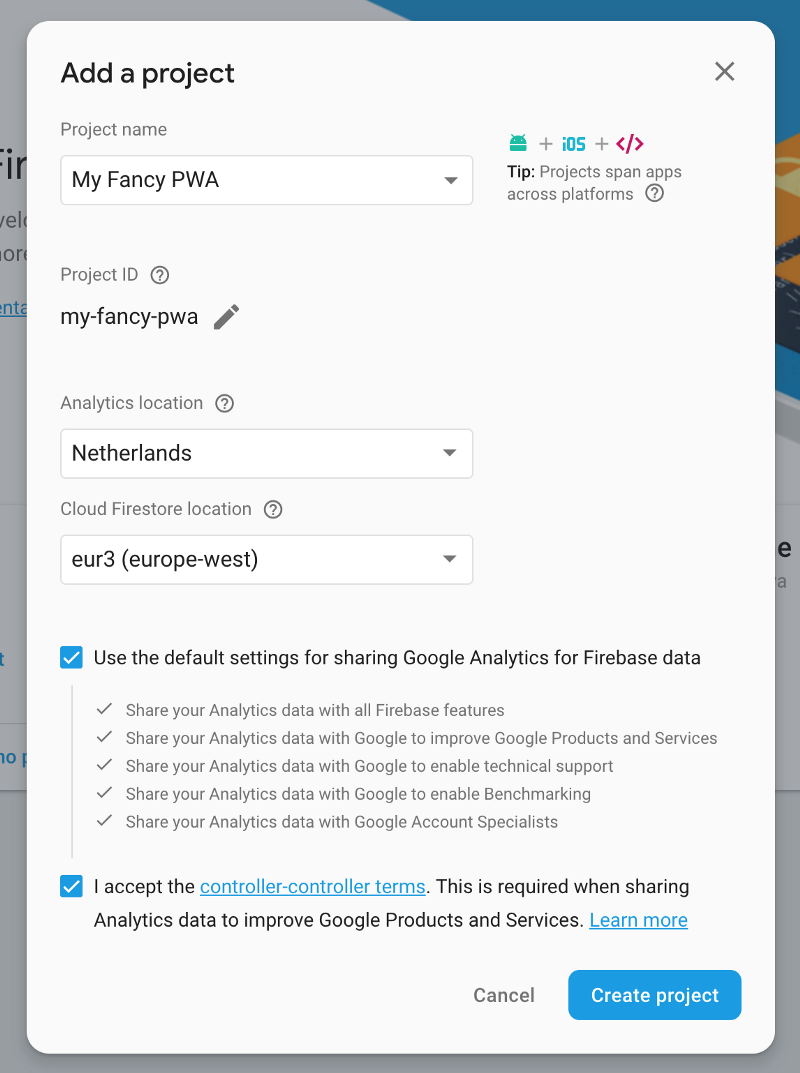
Creating a new project for your app on Firebase
The easiest way of using Firebase services is to make use of Firebase CLI through a console. To access Firebase CLI on your command line, run one of the following;
npm i -g firebase-tools
npx firebase // or use npx to avoid global installation
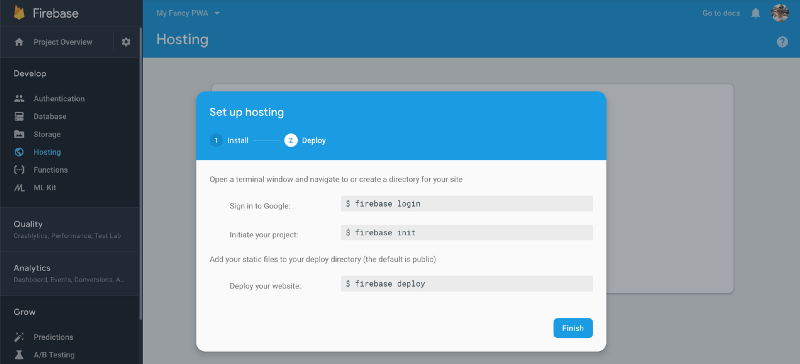
Setting up hosting on Firebase
After creating your project, navigate to Hosting tab under develop category. Click Finish in order to make your project available on CLI.
Initializing Firebase config
You can deploy your PWA to Firebase by simply executing 3 commands via Firebase CLI; login, init and deploy. We’ll only make use of hosting service of Firebase for now. In order to do that, you should execute firebase init on your project root and then check that with Space key and press Enter.
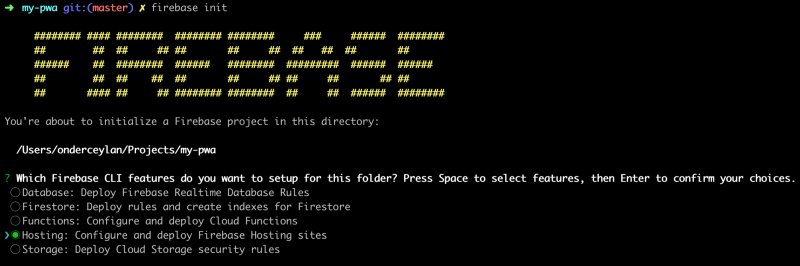
Options for initialising Firebase on your project
On the next step, it will show your existing projects to you to set up a hosting on. Select [create a new project] option to create a default project for your app. After that, answer the steps like below;
- What do you want to use as your public directory?
dist/my-pwa— This is the path for your production build that is configured on angular.json file under outputPath. - Configure as a single-page app (rewrite all urls to /index.html)?
y - File dist/my-pwa/index.html already exists. Overwrite?
n
As an output of this setup, Firebase CLI creates 2 files in your project root: firebase.json and .firebaserc
10. Configuring a Firebase hosting for your PWA
It’s possible to configure your hosting on Firebase via firebase.json file in your project. You can see the default configuration of which Firebase CLI created for your project below;
{
  "hosting": {
    "public": "dist/my-pwa",
    "ignore": [
      "firebase.json",
      "**/.*",
      "**/node_modules/**"
    ],
    "rewrites": [
      {
        "source": "**",
        "destination": "/index.html"
      }
    ]
  }
}
It’s important to be aware of a couple of points on this configuration.
- Since Angular is a SPA (Single Page Application), you must configure rewrite as above to point all sources to your index.html file.
- Do not deploy any file that keeps your credentials under no circumstances. Keys, secrets, and such confidential information on your configuration files that relies on the public folder you pointed out, might be exposed to the world immediately. Make sure to ignore any configuration file you have in your public folder, or else;
10.1 Adding custom HTTP headers for caching
Firebase hosting configuration allows you to add custom HTTP headers for your project.
This configuration is especially important for your PWA where you might want to cache your static assets and gzip them to improve your app’s loading performance. A long cache lifetime can speed up repeat visits to your page.
When a browser requests a resource, the server providing the resource can tell the browser how long it should temporarily store or cache the resource. For any subsequent request for that resource, the browser uses its local copy, rather than going to the network to get it. — Cache policy on Google Developers portal
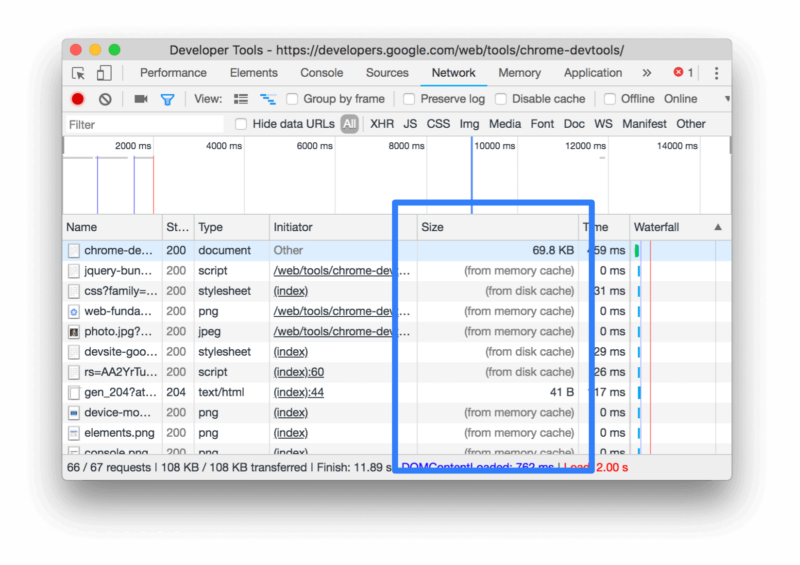
Verifying cached responses in Chrome DevTools — Cache policy on Google Developers portal
Since Angular creates your static resources with a hash postfix in the filename, you can take advantage of introducing a long cache lifetime for those resources by adding Cache-Control HTTP header. When you do that, you should also consider invalidating your caches. However, invalidating caches of static resources is not required for your Angular app as Angular’s build system automatically changes the postfix hash in your resources’ file names when they’re updated.
Moreover, Firebase automatically compresses static resources with gzip and returns a response with Content-Encoding gzip header where it applies. But I’d like putting that explicit header anyway to make the intent visible.
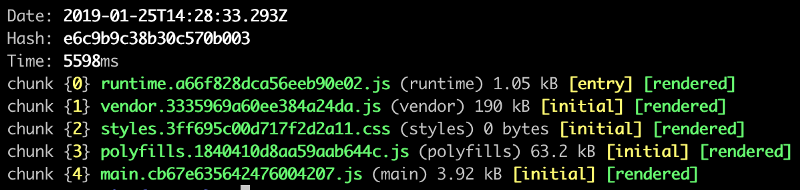
Production build output of Angular where vendor chunk is enabled. Demonstrates hashes in filenames as well.
💡 TIP — Introduce vendor chunk to your production build configuration for your Angular app — see vendorChunk option in angular.json. This will help on your PWA’s cache strategy as you most likely will not update vendor libraries too often.
The following example demonstrates adding long cache lifetime and providing compressed static resources;
{
  "headers": [
  {
    "source": "**/*.@(js|css)",
    "headers": [
      {
        "key": "Cache-Control",
        "value": "max-age=31536000"
      },
      {
        "key": "Content-Encoding",
        "value": "gzip"
      }
    ]
  }
}
You might have noticed above that Firebase configuration accepts glob-like pattern for source files.
10.2 Keeping your additional service worker files fresh
If you make use of such cache configuration above for all your js and css files, you must create an exception rule for your additional service worker files. Here’s an example of no-cache exception;
{
  "headers": [
  {
    "source": "**/*-sw.js",
    "headers": [
      {
        "key": "Cache-Control",
        "value": "no-cache"
      }
    ]
  }
}
This rule will make sure that we’ll keep all our service worker files matching with the file name pattern \*/*-sw.js* fresh.
10.3 Adding HTTP/2 server push with link headers
HTTP/2 is currently enabled for all *.firebaseapp.com traffic and to utilize HTTP/2 on Firebase Hosting, you don’t have to do anything! It will automatically be served if the user’s browser supports it. Read more about it here:
However, you might want to manually introduce HTTP/2 server push to your app. By using Link headers, Firebase hosting introduced experimental support for HTTP/2 server push. Server push allows a server to automatically send the contents for additional resources when an initial request is made. A common use for server push is to send associated static resources — like JavaScript and CSS files when a page is loaded.
You need to add the Link header to your firebase.json config file with pointing out the path of your static resources in order to configure server push on Firebase hosting. Here’s an example;
{
  "headers": [
    {
      "source": "/",
      "headers": [{"key": "Link", "value": "</js/app.js>;rel=preload;as=script,</css/app.css>;rel=preload;as=style"}]
    },
    {
      "source": "/users/*",
      "headers": [{"key": "Link", "value": "</js/app.js>;rel=preload;as=script,</css/app.css>;rel=preload;as=style;nopush,</css/users.css>;rel=preload;as=style"}]
    }
  ]
}
10.4 A basic hosting configuration example
Following example demonstrates a configuration example of one of my PWAs. I recommend you to read the documentation of hosting configuration on Firebase for you to understand all possible configuration options.
Example of a full firebase.json configuration file that I use on one of my PWAs:
{
  "hosting": {
    "public": "www",
    "ignore": [
      "firebase.json",
      "3rdpartylicenses.txt",
      "**/.*",
      "**/node_modules/**"
    ],
    "rewrites": [
      {
        "source": "**",
        "destination": "/index.html"
      }
    ],
    "headers": [
      {
        "source" : "**/*.@(jpg|jpeg|gif|png|svg)",
        "headers" : [
          {
            "key" : "Cache-Control",
            "value" : "max-age=86400"
          },
          {
            "key": "Content-Encoding",
            "value": "gzip"
          }
        ]
      },
      {
        "source" : "**/*.@(js|css)",
        "headers" : [
          {
            "key" : "Cache-Control",
            "value" : "max-age=31536000"
          },
          {
            "key": "Content-Encoding",
            "value": "gzip"
          }
        ]
      },
      {
        "source": "**/*-sw.js",
        "headers": [
          {
            "key": "Cache-Control",
            "value": "no-cache"
          }
        ]
      }
    ]
  }
}
11. Deploying your PWA to Firebase
Deploying an app to Firebase is simple as it can be. Just execute firebase deploy via Firebase CLI in your project root and you’re good to go!
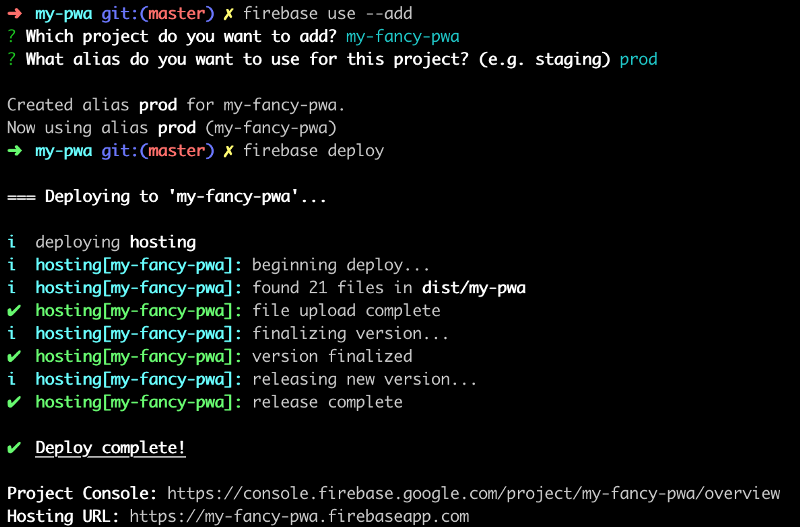
You might need to add a project if you haven’t done already
12. Auditing your PWA with Lighthouse
Lighthouse is an open-source, automated tool for improving the quality of web pages. You can run it against any web page, public or requiring authentication. It has audits for performance, accessibility, progressive web apps, and more.

Auditing a PWA can be done on online audit runner, on Chrome DevTools and through Lighthouse CLI.
12.1 Using online audit runner
You can run Lighthouse audits by navigating to the link below and entering a URL of which application you’d like to run the audits on.
12.2 Using Chrome DevTools
Once you configure your PWA by following the tips on this article and deploy your app to firebase with recommended configuration, your app is ready for an audit. You can run an audit on Chrome DevTools and see a score of 100 for the Progressive Web App audit.
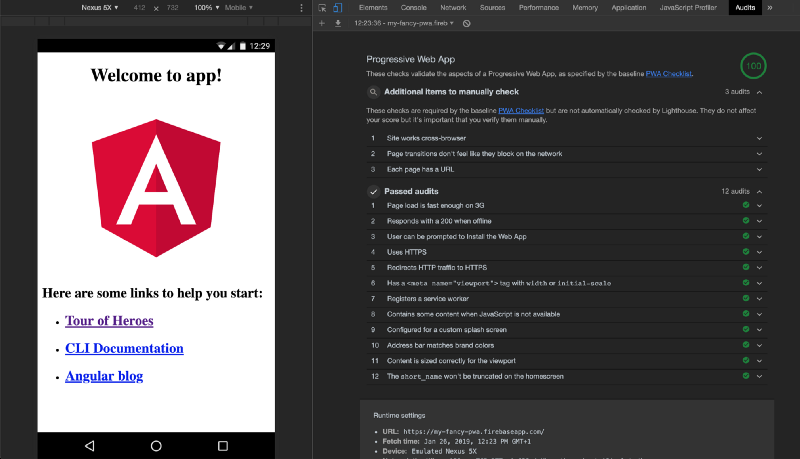
💯score on Lighthouse PWA audit — Chrome DevTools Audit
12.3 Using Lighthouse CLI
An audit with Lighthouse can be automated on your continuous integration environment via Lighthouse CLI. This will make sure that not any of your changes will impact the score on any of the audits you set — see CLI options within your Lighthouse regression.
💡 TIP — You can compare the Lighthouse reports of your current and previous audits to make sure there’s no impact to your app related to your changes.
The following command will execute a headless Chrome and run audits against the url and then will display a report.
npx lighthouse https://my-fancy-pwa.firebaseapp.com --chrome-flags="--headless" --view
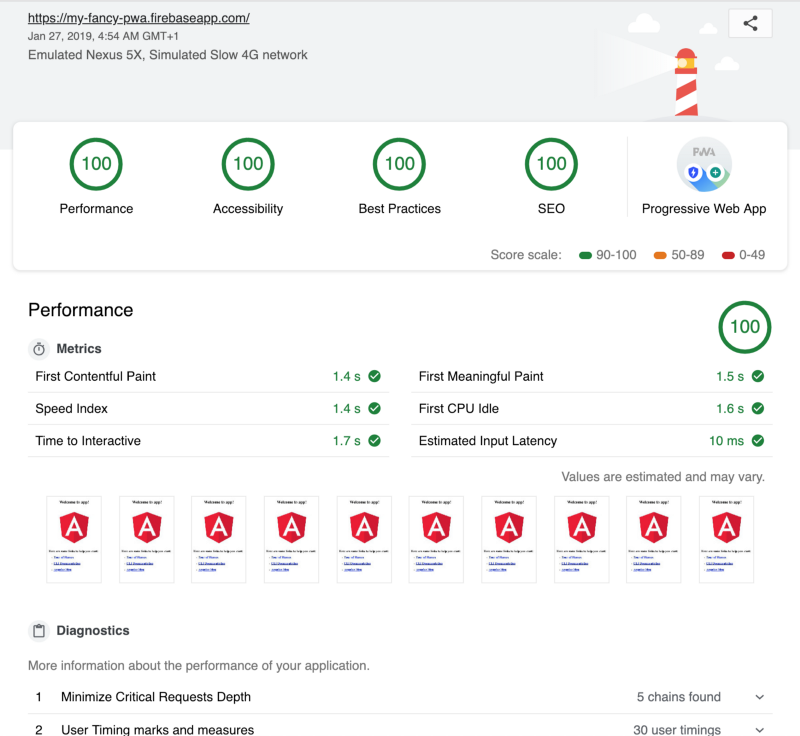
Lighthouse CLI report, viewed as html
💡 TIP — Executing nightly regressions on your production app to monitor it against updated PWA audits will help you to align with future PWA best practices as the list of audits get updated in time.
What else is there for your PWA?
With the ever-growing power of the web, anything you can introduce to a web app is an option for your PWA. Make sure to check out WebKit Feature Status for iOS and Chrome Platform Status for Android platform compatibility for the features and Web APIs you’d like to adapt.
One year after the first beta of iOS 11.3, Apple recently released the first beta of iOS 12.2. This is the first version since PWA support was introduced and there are quite good improvements in it — focusing biggest issues of PWAs on iOS. Read more about it here:
Furthermore, you can get inspired by the capabilities of your browser by simply browsing https://whatwebcando.today and https://tomayac.github.io/pwa-feature-detector/ on your mobile or desktop browser.
If you’d like to add push notifications functionality to your PWA, you can follow the guide below of my colleague Ural.
Follow me on Twitter for more tips like the ones in this post.
Please don’t forget to like and follow if you find this article useful. And, feel free to write comments about your PWA development journey. I’d love to hear all about it!


