Automate your integration tests and semantic releases with GitHub actions
A real-life migration story of the pipeline of an open-source library from Travis CI to GitHub actions and a tutorial on automated semantic releases.
I recently migrated CI/CD pipeline of one of my open source projects — pwa-asset-generator from Travis CI to GitHub actions. I was one of the members who got early access to GitHub Actions beta, and I’d like to share my experience of such migration with the community in return.
The referred project and examples in this article are based on node.js, eslint, TypeScript, Jest, semantic-release and npm stack. The principles are the same for any other tech stack, so you should be able to use a similar flow with your own project as well.
In this article, we’re focusing on building 2 pipelines;
- CI — builds a TypeScript node.js project, lints the code and runs tests on the project
- Release — builds the project and deploys an npm package to npm repository with semantic-release
Whether you’re migrating from Travis CI to GitHub actions or migrating from CircleCI to GitHub actions or starting a new open source project on GitHub, this article should give you a head start on your CI/CD journey.
About GitHub actions
GitHub announced its own continuous integration service as an alternative to services out there like Travis CI, Circle CI and others.
It’s free for open source projects as Travis CI and Circle CI are, and it’s well integrated with GitHub ecosystem.
GitHub introduces a few concepts in their continuous integration context. Core concepts such as workflows, jobs, steps, actions, runners, events and artifacts are documented on GitHub actions documentation.
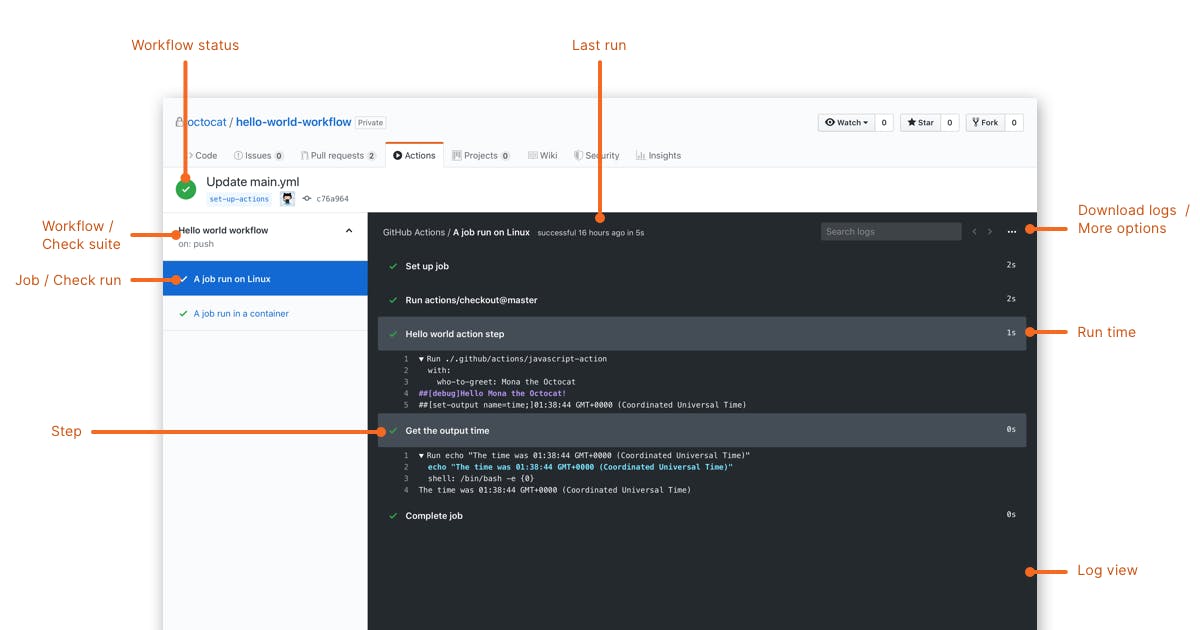
I’d like to summarize the concepts that we will use on our CI and CD pipelines for a better understanding of the ecosystem we’re in.
Workflows
Workflows are basically pipelines, which can build, test, package, release, or deploy any project on GitHub. They are made up of one or more jobs and can be scheduled or activated by an event. Each workflow must be declared by a YAML file under .github/workflows folder in your repository.
For example; ci.yml for a CI workflow, or release.yml for a release workflow.
Jobs
Jobs are basically tasks made up of steps. A fresh virtual environment is created for each job. Dependencies and configurations of a job are declared on the workflow file.
For example; build job for compiling your project, or test job for executing unit/integration tests.
Actions
Actions are basically tasks that you combine as steps to create a job. They are the smallest portable building blocks of a workflow. It provides a flexible architecture as you can create your own actions based on docker images, use actions shared by the open source community, and customize public actions. Actions must be included as a step in order to use within a workflow.
For example; actions/checkout action on a step for checking out your project, or actions/setup-node action on a step to setup node dependency.
Creating an integration workflow — CI
In our context, we are going to create an integration workflow with the goal of;
- Installation of our project dependencies to install and setup our toolset for further steps.
- Compilation of our TypeScript code to assure we don’t have any compilation issues.
- Linting of our TypeScript code with eslint to assure we maintain a specific code quality.
- Testing of our functionality with unit and integration tests with Jest to assure our product quality.
In order to accomplish our goal, we need to create a new workflow file under .github/workflows folder of our repository. Let's call it CI.yml and create this file with the following content.
name: CI

on: [push]

jobs:
  test:
    name: Test on node ${{ matrix.node }} and ${{ matrix.os }}

    runs-on: ${{ matrix.os }}

    strategy:
      matrix:
        node: [8, 10, 12]
        os: [ubuntu-latest, macOS-latest, windows-latest]

    steps:
      - uses: actions/checkout@v1
      - name: Use node ${{ matrix.node }}
        uses: actions/setup-node@v1
        with:
          node-version: ${{ matrix.node }}
          registry-url: https://registry.npmjs.org
      - name: install
        run: npm install
      - name: lint
        run: npm run lint
      - name: build
        run: npm run build
      - name: test
        run: npm test
As you might have noticed, I set specific versions to the actions I’m using — actions/checkout@v1. This is a good idea when you deal with a tool on beta stage as it might introduce breaking changes otherwise.
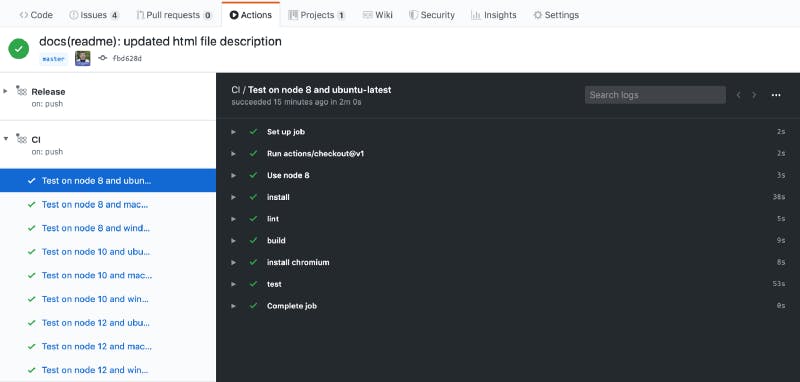
A demonstration of a CI run of pwa-asset-generator — you can see it in detail here
It introduces node and OS matrixes for the pipeline, which means that test job will run on 3 x 3 = 9 environments, namely;
- Test on node 8 and ubuntu-latest
- Test on node 8 and macOS-latest
- Test on node 8 and windows-latest
- Test on node 10 and ubuntu-latest
- Test on node 10 and macOS-latest
- Test on node 10 and windows-latest
- Test on node 12 and ubuntu-latest
- Test on node 12 and macOS-latest
- Test on node 12 and windows-latest
See the full list of environments that are supported by GitHub actions here: https://help.github.com/en/articles/virtual-environments-for-github-actions
The steps on test job can also be individual jobs but good to acknowledge that it will take more time to execute as we need to spinoff a new environment and install dependencies for each job.
You can also schedule your runs based on a cron, for instance nightly builds. To read more about all other configuration options on a workflow, visit Configuring a workflow documentation.
Creating an automated release workflow with semantic release— CD
I’m a big fan of one-button deployments aka continuous deployment. It’s quite easy to setup a CD pipeline for node.js projects that are deployed to npm with the use of semantic-release.
In this context, we are going to create a release workflow with the goal of;
- Installation of our project dependencies to install and setup our toolset for further steps.
- Compilation of our TypeScript code to assure we are ready with our build artifact — dist folder in our context.
- Release of our artifact with semantic-release to automate releases for each code push on our master branch.
In order to accomplish our goal, we need to create a new workflow file under .github/workflows folder of our repository. Let's call it release.yml and create this file with the following content.
name: Release

on:
  push:
    branches:
      - master

jobs:
  publish:
    runs-on: ubuntu-latest
    steps:
      - uses: actions/checkout@v1
      - uses: actions/setup-node@v1
        with:
          node-version: 12
          registry-url: https://registry.npmjs.org
      - run: npm install
      - run: npm run build
      - run: npx semantic-release
        env:
          NODE_AUTH_TOKEN: ${{ secrets.NPM_TOKEN }}
          NPM_TOKEN: ${{ secrets.NPM_TOKEN }}
          GH_TOKEN: ${{ secrets.GH_TOKEN }}
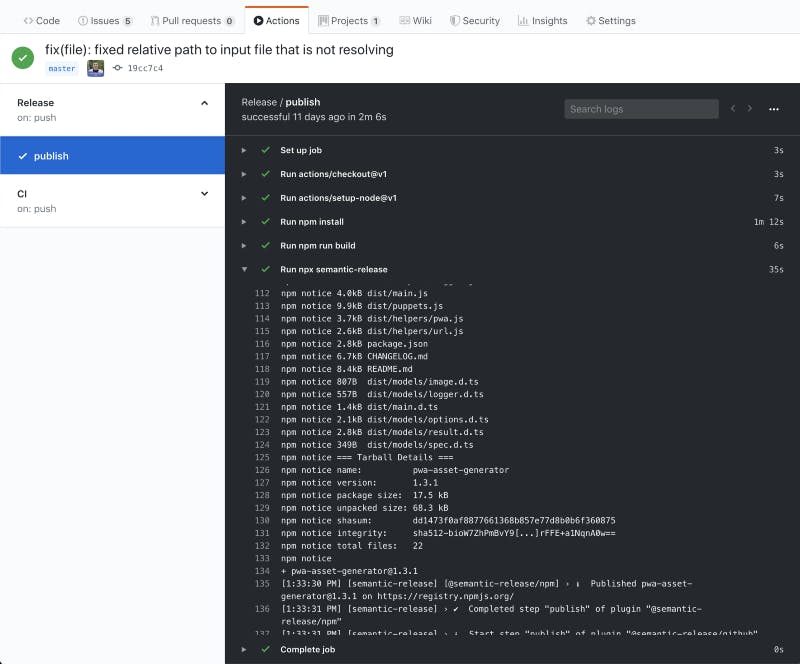
A demonstration of a release run on pwa-asset-generator — you can see it here in detail
Setting up secrets
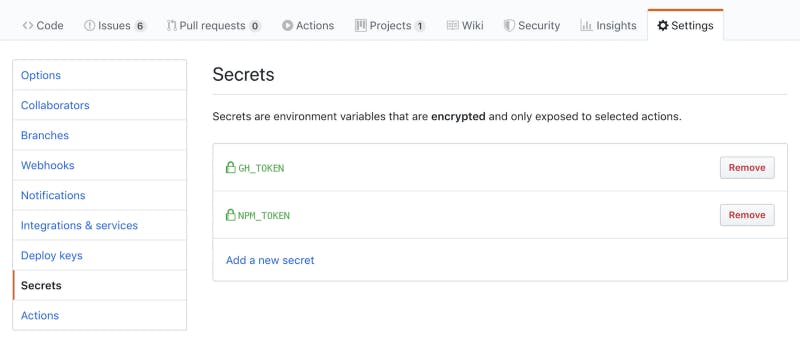
As you might have noticed, there are secret environment variables set for semantic-release, which are required for deploying our package to npm and creating automated chore commits on our GitHub repo.
You can set those secrets on your GitHub settings and use them in your workflow files with this format: ${{ secrets.SECRET_NAME }}. To setup secrets;
- Navigate to the Settings of your GitHub repo and click on the Secrets menu on the left sidebar. Then click on Add a new secret link.
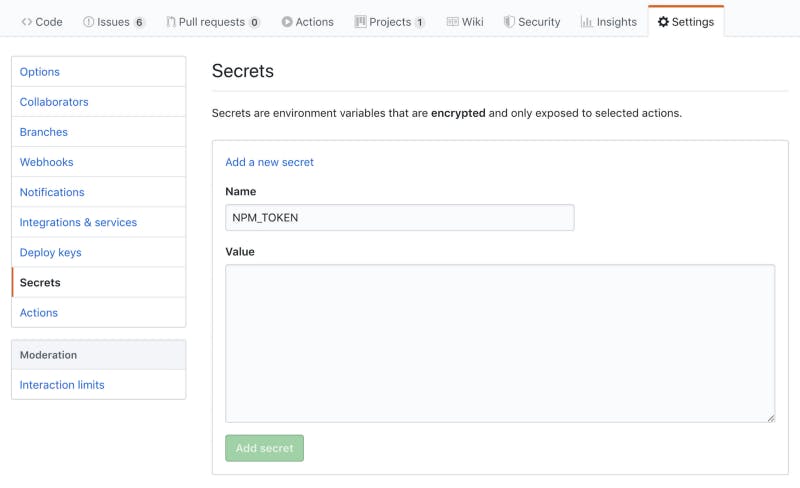
Put in a name for your secret, which you’ll later use as environment variable on your workflow file.
2. Repeat the same for both NPM_TOKEN and GH_TOKEN secrets, which both are required by semantic-release for automated release on npm and administration in your repo on GitHub.
You can create your npm token on your npm console: https://www.npmjs.com/settings/username/tokens
You can create your GitHub token on your GitHub profile: https://github.com/settings/tokens
Note that a typical semantic-release setup requires these permissions on GitHub token: read:org, read:packages, repo, user:email, write:packages, write:repo_hook
Skipping workflow runs for chore commits
Semantic release library automates a series of chore commits after each successful release. Those commits are automated by release-notes-generator and github plugins but not limited to — see the full list of plugins.

See all the commits tagged with chore in pwa-asset-generator
After having the chore commits in the repo, GitHub actions runs an additional workflow run as any commit should trigger a run on CI workflow.
However, having an additional workflow run is not necessary and it’s a good practice to skip CI runs caused by any of chore commits. As you might noticed above, chore commit messages include [skip ci] text, added by semantic release for each chore commit.
We can configure GitHub actions to skip runs for all the chore commits including [skip ci] message by adding the following configuration;
name: Release

on:
  push:
    branches:
      - master

jobs:
  prepare:
    runs-on: ubuntu-latest
    if: "! contains(github.event.head_commit.message, '[skip ci]')"
    steps:
      - run: echo "${{ github.event.head_commit.message }}"

  publish:
    needs: prepare
    runs-on: ubuntu-latest
    steps:
      - uses: actions/checkout@v1
      - uses: actions/setup-node@v1
        with:
          node-version: 12
          registry-url: https://registry.npmjs.org
      - run: npm install
      - run: npm run build
      - run: npx semantic-release
        env:
          NODE_AUTH_TOKEN: ${{ secrets.NPM_TOKEN }}
          NPM_TOKEN: ${{ secrets.NPM_TOKEN }}
          GH_TOKEN: ${{ secrets.GH_TOKEN }}
The configuration example above is for release workflow and you can use the same approach for your CI workflow as well.
Adding the status badge of your workflow
Now it’s time for the fun part. Every open source project deserves a badge/shield to show their users that it’s well maintained. One of the most popular badges for an open source project is the build status badge.

You can find many available shields for various vendors here: https://shields.io/category/build
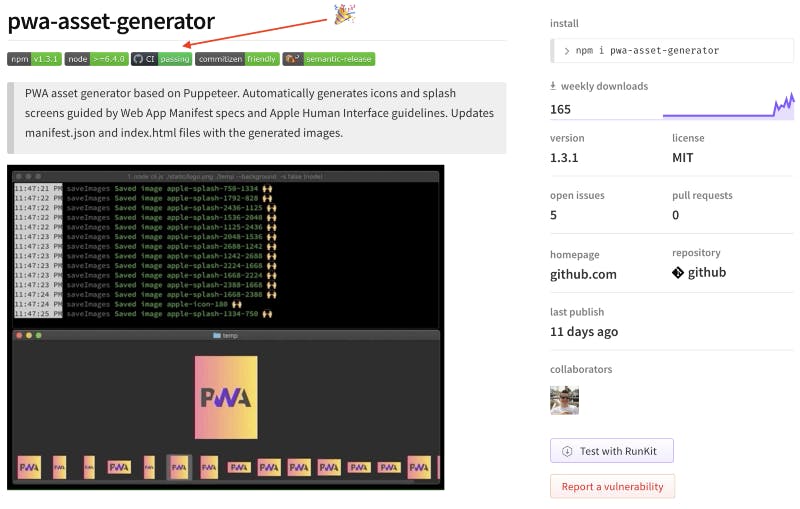
GitHub actions provide their own status badges for each workflow. As you can see on my project pwa-asset-generator on both GitHub and npm, it uses CI workflow badge to show users that all integration tests are passing.
Demonstration of GitHub actions CI workflow badge on pwa-asset-generator readme:
You can use an SVG image link on your project to display the badge of your GitHub actions workflow with this pattern:
https://github.com/{username}/{repo}/workflows/{workflowname}/badge.svg
The SVG link displaying your workflow status with the name of your workflow:

Here’s the markdown for badge only, which you can use on the README file of your project;

Here’s the markdown for badge and link to your actions together;
[](https://github.com/{username}/{repo}/actions)
GitHub actions currently has an issue with displaying latest workflow status on your status badge if latest run is skipped.
I reported this issue to GitHub. If you’re like me and think that status badge should display status of the latest run before the skipped runs, feel free to give kudos (upvote) to the issue.
Congratulations!
You made it! Now you have an automated integration and deployment pipeline for your project running on GitHub actions.
You can drop me a message on Twitter if you need any help on your CI/CD setup. Cheers!

